
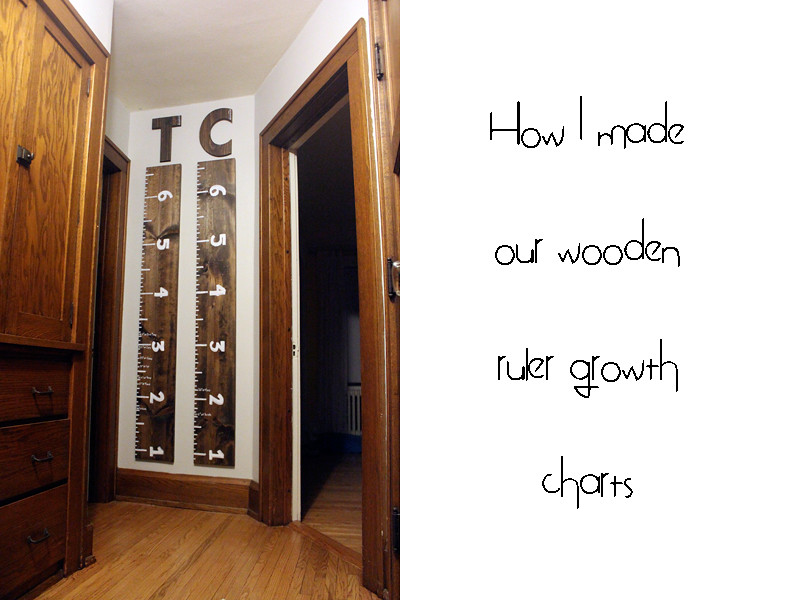
I've seen this project on Pinterest for some time now and have been meaning to make a wooden growth chart for ages. And finally! I actually did it. And honestly, it was not difficult at all. I cannot believe these are going for $100 a pop on Etsy. Sure, they were a project that took a few evenings but it was a lot of fun for me to make them for our kids. Love the end result.
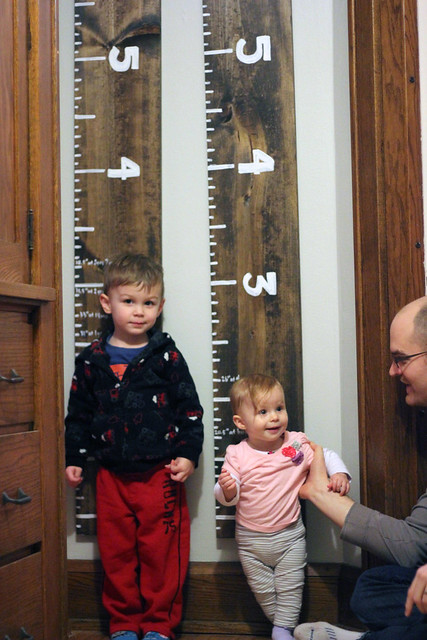
They love it, too.
So if you want to make your own giant rulers here is the scoop:
-You will need a 1"x10"x6' board. I got ours from Home Depot and at first I was going to do one ruler for all kids, but then when I realized these boards were $4.79 each I decided to splurge. Wanted to make sure Nate knew that a project like this doesn't mean we are necessarily done having children. Could always make a third ruler down the road, FYI. ;) I tried to find an old, shabby wooden board for us to use in our garage but they were all too warped. I'm glad I bought these new.
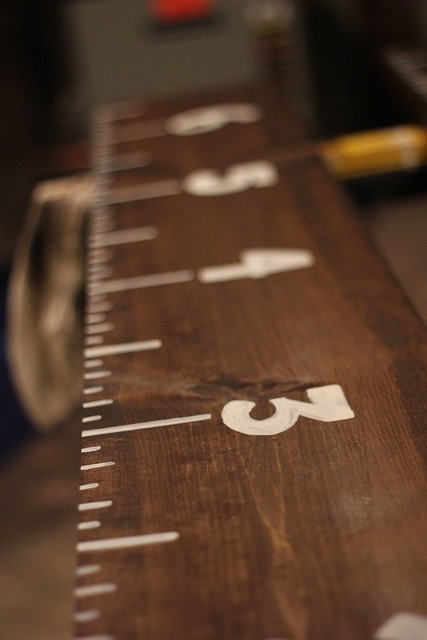
-You can stain the boards like I did or keep them natural. I really like a lot of the pins that show the rulers being VERY true to life. Meaning, I'm sure they didn't stain the boards and they used stencils to make the font a perfect ruler font. I did not go this route, though, and wanted my charts to be a little more personalized.
-You'll need a paint pen to mark on the boards. I used Sharpie's brand and it was fine, and was $3.50 from Home Depot. They also have it at Joanns. It's oil based and easy to use. I was torn about using a different color for the actual height markings for my kids compared to the ruler itself but I went with white for all and it looks fine.
-Then all you need is something to hang the boards--I picked up a few triangle hooks and Nate used one on each board. They were $4.60 for a pack of two.
Which means I spent about $19 on these guys. It took me a total of 3 hours to make plus hanging them up after that.
And now for the procedure itself.
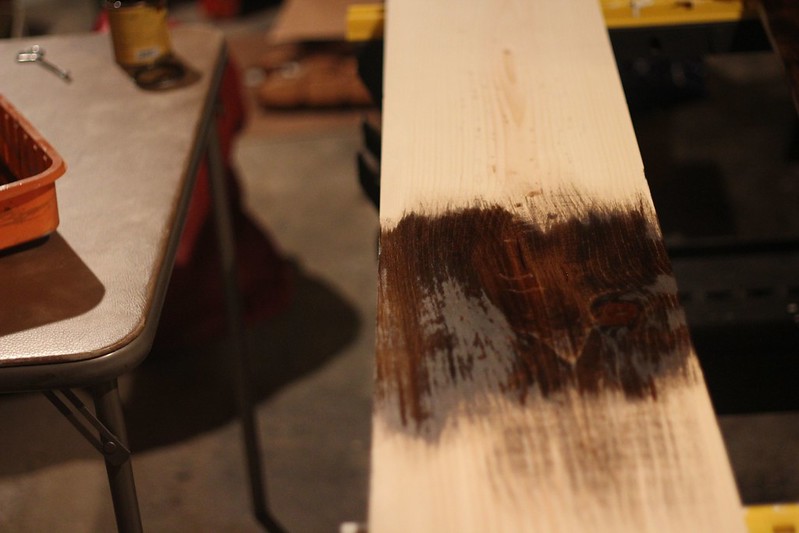
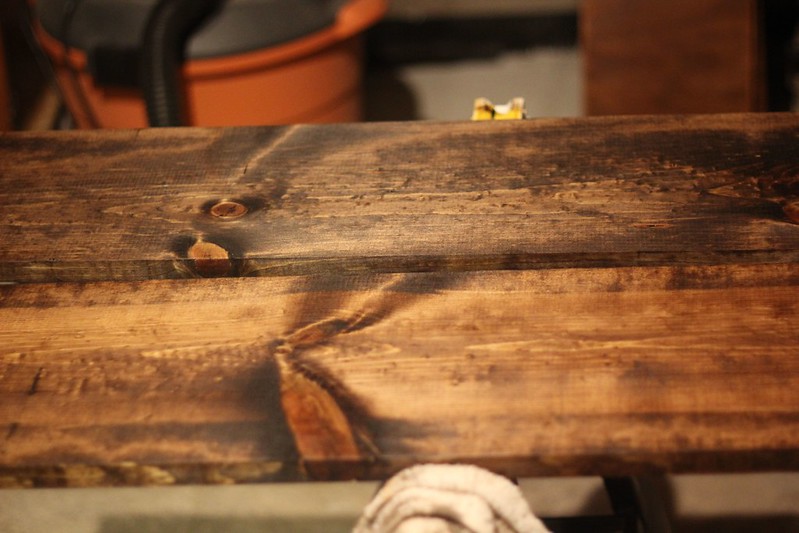
1. I lightly sanded the boards and then stained them a dark brown that we already had. Staining wood is really cool but really messy. This took me about 30 minutes total for both boards.

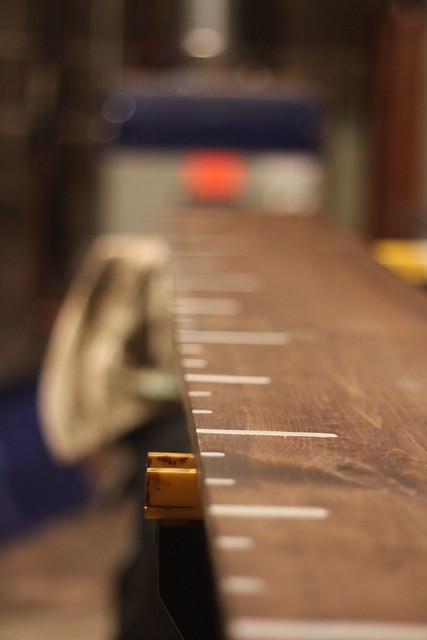
2. The next night I got out one of Nate's corner level thingies (yes that is a word) and measured off the tick marks. Now this is the trickiest part, in my opinion. You have to decide BEFORE you draw anything where you are going to hang these bad boys. We measured our baseboards to be 8" and figured that if we started the bottom of the board two inches up from there we'd be good. Does that make sense? I didn't want the '1' to be right at the bottom but I needed it to be pretty close. So I marked everything off after deciding on that pivotal point. We had two inches of blank space on our wall, and then two inches before the first foot began on the board because of how tall our baseboards are.
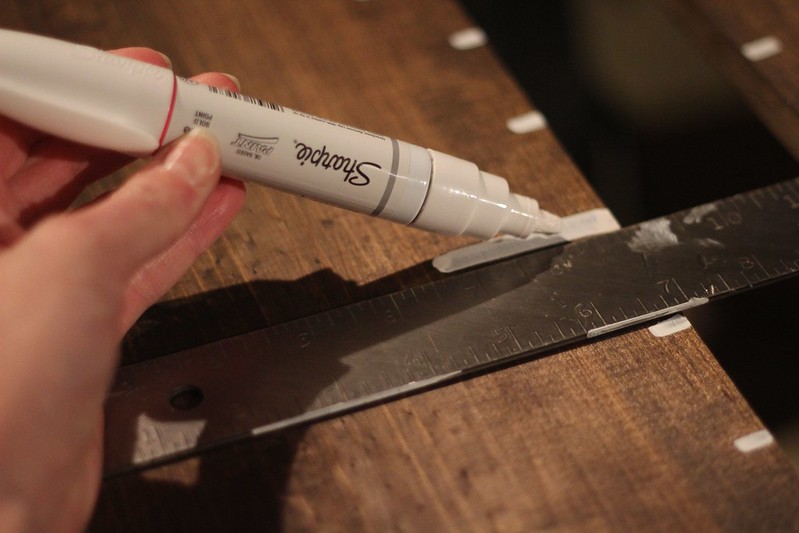
3. This is when I decided that my growth charts were not going to be as 'perfect' as the ones on Pinterest. I HATE stencils and never ever use them for things. I'm all about free handing even if it's not perfect, so that is what I did for my numbers. Just eyeballed it and went from there.
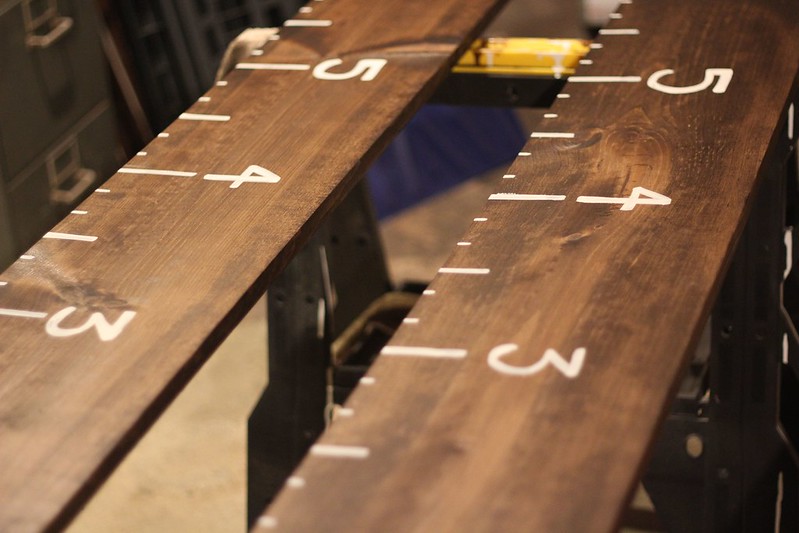
4. Then I decided that I needed more tick marks than just every-other-inch. I fattened up the numbers to my liking and this whole part of the tick marks and numbers took me 2 hours.
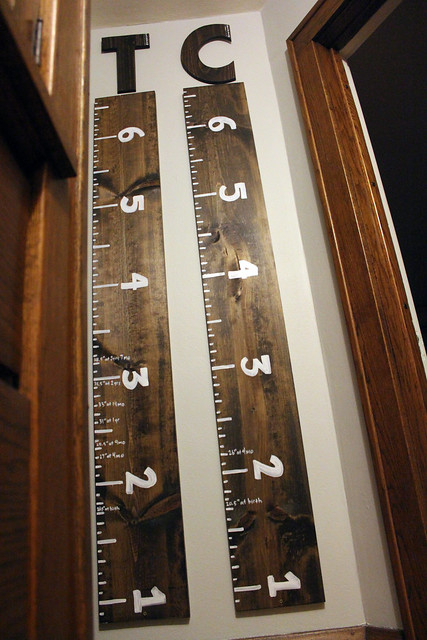
5. The third night I grabbed Truman and Cecelia's baby books and 'cheated' by adding all of these heights right onto my boards. I think it's kind of funny that I have their birth heights on there since obviously, they were not standing up next to the boards to be measured. But I like to have the markings start at the beginning, then I chose 4 months, 9 months, 1 year, 18 months, 2 years, 2.5 years-ish, and will do 3 years to get us started. Whew! I didn't do a line for each measurement here---just wrote right on the board instead. This took maybe 15 minutes max. I was nervous about this part of it because none of my inspiration pictures online showed any heights written on the boards. It seemed like the perfect stenciled ones were all for show and never actually measured the kids growing up. But alas, I like the way it looks with each entry!

6. I originally got the 10" boards because I thought they would be wide enough to add my kids' names to the rulers like this. But I ran out of room and was bummed that I couldn't personalize the rulers for each of my babes. So then I decided to head to Joann's Fabrics and I picked up these wooden letters that were $5 each. I stained them to match the rulers and let them sit overnight. This took about 15 minutes.
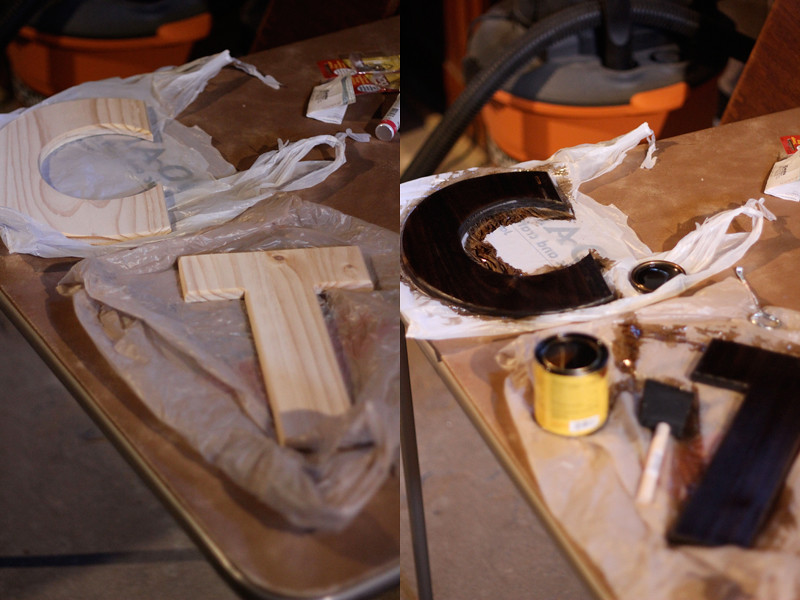
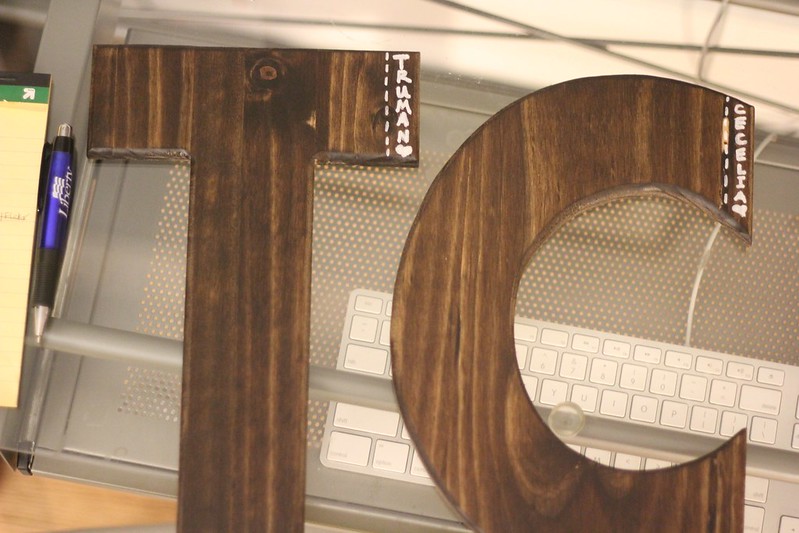
7. Again with the personalization, I had to write the kids names on the letters to make it more 'special' somehow. I did tick marks on there, too. The 'C' had some weird defect where it wouldn't take stain at the top so I tried to blend that in with the writing.
8. Time to hang it all up! This is where Nate saved me because I am NOT good with numbers or levels. He had to make sure he hung the triangle hooks in back (that he added for me) in the exact right spot. It was sort of chaos to hang these but we had a lot of helpers, obviously.

Helping daddy with a level.

She is not amused by big brother reading her a book.

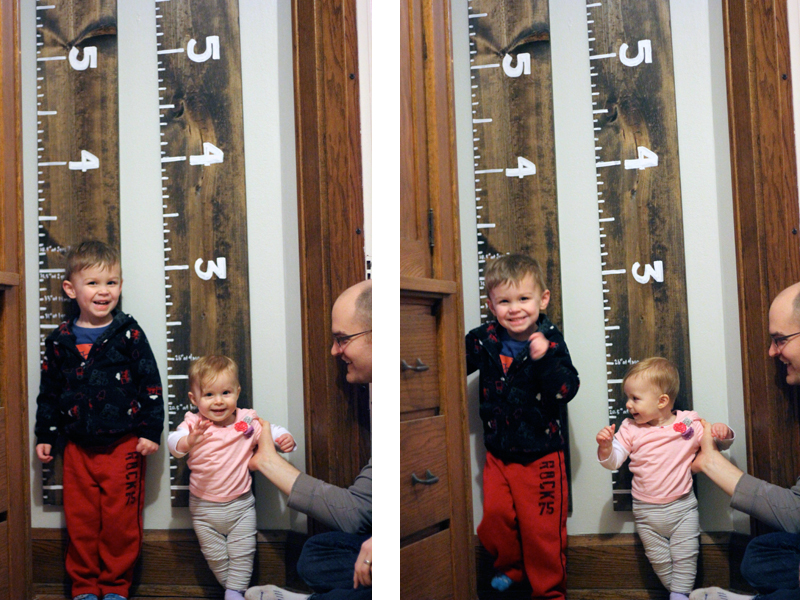
9. FINISHED!!!!
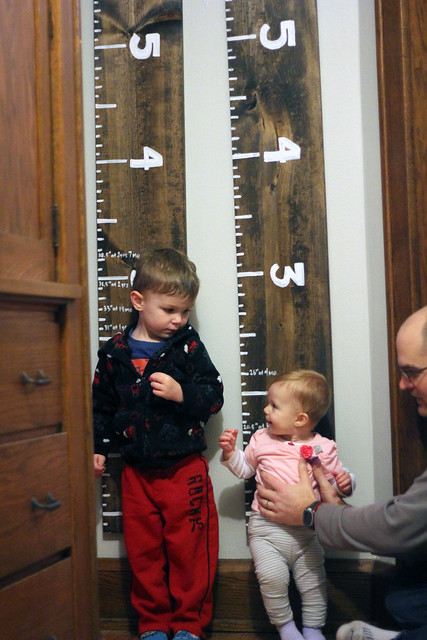
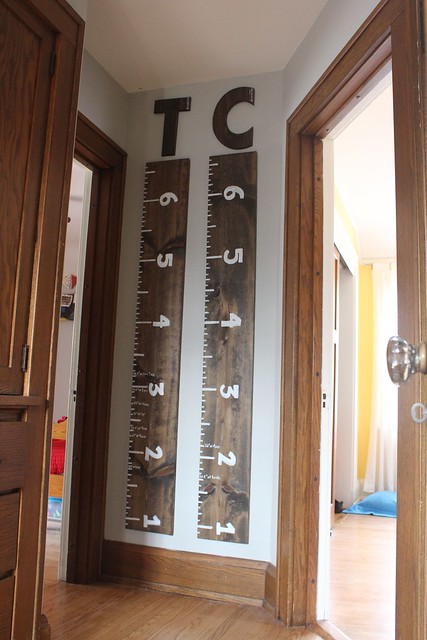
I love that we could move these around our house and not lose the precious growth measurements of our children. My mom kept track of my height and my brother's height directly on their wall. And now I believe she has that part covered up by a large protective, clear, plastic shell. But it can't move with them if they ever go. And again---could totally add more rulers. Or you could do one ruler for the whole house. You could make it more 'professional' looking by using a stencil for the font and being really meticulous with the length of the hash marks. But I did it this way and it turned out how I had hoped.
Do growth charts make anyone else choke up a little bit? Look at how fast my kids are growing already! Can't imagine them getting up near that six foot line, but I know it will be soon.


This project turned out really cute and I love how it fits in with your home decor so well also. It has be wondering what my mom did with our growth charts!
ReplyDeletelooks awesome! Great tutorial too, I was planning on doing a version of these (wood, fabric, not sure yet) when we move into the new house :)
ReplyDeleteI love the not-so-subtle hints about more rulers! I did the same thing - I have a height chart that sticks to the wall, but I put all the heights we had measured so far. Including my mother's, who couldn't be left out of the measuring fun. You are so creative - I only like to do crafts that I can sit on my butt and do. :)
ReplyDeleteLoooooooooove this!! It's on my list of things to do for the Big Boy Room at our house. :) Thanks for the great tutorial!
ReplyDeleteI am IN LOVE with these. Definitely on the list of projects for the new house. Thanks for sharing!!
ReplyDeletelove the project. what a great idea. my mom kept track of our heights on a door frame & then when we moved she cut it out of the door and took it with us. ha. this seems like a much better idea!!! oh pinterest & DIY.
ReplyDeletewould love to do these for my babies one day.
Super cool, Julia! I love the stain you used. I haven't ventured over to Pinterest in like 82 years so I have no idea what the others looks like but I like the classic look of yours for sure. I imagine Truman and Cecelia will use these one day for their own babes. How awesome would that be!?
ReplyDeleteSo cool!! I hadn't seen this on Pinterest. I am most definitely stealing this idea. I have the perfect place to hang them! And I think I'm gonna need to buy that $40 kids calendar you have pinned...we need something new and more durable and that one is awesome.
ReplyDeleteGreat job, Julia!! They look awesome. I haven't seen the ones on Pinterest, either, but yours are great!
ReplyDelete"$4.79 each so I decided to splurge" - that made me giggle. Big spender!! ;) Love that you got two - and just maybe might add one more one day!
You DIY'ers amaze me. I wouldn't have the patience. Very cool!
ReplyDeleteVery cool! Reminds me of the growth charts from Minneapolis company Wood from the Hood, where they take wood from fallen trees and make all sorts of things.
ReplyDeletehttp://woodfromthehood.com/product-category/growth-charts/
So cute! Love that there's room for more as well!
ReplyDeleteI live love love this project. When I was working on the nursery, Ryan cut me a board and stained it for this project. I even got all the tick marks on before I had Henry early.
ReplyDeleteThem, a week or two after Henry was born, my aunt stopped over with a custom made growth chart that a local woodworker made. I nearly died from excitement. I actually like it a lot better than the one I was working on because the board Ryan cut didn't look exactly like I wanted. However, it starts at 0, which is hard with 10 inch base from. So it's still not hung.
Okay. I know you don't really care. But that's my story. Love this project and your version.
These are awesome! I may have to lift the idea and make one for M!
ReplyDeleteThanks for posting this! I have had these on my "to-do" list for awhile now but have been too busy in the new house to start anything like it. I LOVE the way yours look and I will definitely be using some of your techniques. Still can't decide if I want each kid to have one or just share. I wouldn't want them to fight when they get older. I was THIS CLOSE to just buying one over the holidays but couldn't find one I liked. Most Etsy sellers use stickers or burn in the letters...I like your paint. OK, done now. Happy day :)
ReplyDeleteI want!! And I was thinking to myself that this sure would be nice but wouldn't it look silly since I would be starting at age 3 with my oldest? It never would have occurred to me that I could, you know, look back in the baby book and mark it. HELLO!!! What a revelation you gave me.
ReplyDeleteThese look amazing! Great job! I love the letters above the chart. Truman looks so proud of his! I have a similar one for Mac, but I haven't hung it up or marked it yet. Thanks for the reminder.
ReplyDeleteThese are the cutest! I wish we had a wall for one, this inspires me!
ReplyDeleteOh my gosh I LOVE this!
ReplyDeleteLOVE so much.
ReplyDeleteThose look great and I am actually looking forward to making one this weekend!!! I love these!
ReplyDelete