
Sneak peek: worth it!
Painting the radiators is something I've wanted to tackle for some time now, maybe even since we moved here. I know I originally looked into having custom radiator covers made because I thought they were ugly and dangerous and then we moved in and they bumped way down on the priority totem pole. We have also discussed sandblasting the heck out of the radiators to strip all of the old paint away, to get them back to their natural state. But that would require moving the beasts outside and probably is not going to happen. So more paint on top of the hundreds of layers of paint, it is.
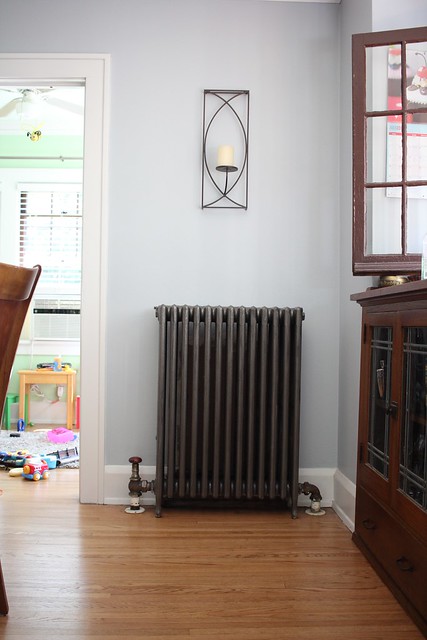
I mentioned it in my Current List of House Projects post back in April, and one common question I've gotten from readers and friends is, 'Are the radiators too hot for kids to touch/are they dangerous?' I was worried about this aspect before we moved into our ninety year old home, but now that we've logged a few winters here I can safely say that our radiators aren't burning hot to the touch. They are warm (and excellent for drying/heating a bath towel!) but won't burn a kid if they put their hand on a radiator, or fall into one. If anything, my biggest issue with our radiators are that they collect dust like a mother and the countless paint jobs the previous owners did to these babies haven't held up well over the years. I'm pretty sure the last owners had every wall and every radiator painted this flat cream color and therefore cream has become my most hated shade in this house. We are close to having every square inch repainted or refinished now---floors, walls, trim, ceiling, EVERYTHING. But the beloved radiators somehow scraped by without getting our personal touch, mostly because it was so overwhelming to consider such a project.
I did paint Porter's radiator in his nursery with a brush, using the same wall paint for his room, and although it took me an absurd amount of time and destroyed my paint brush I liked how the radiator fades into the wall a bit (instead of jumping out at me with it's nasty yellowish-creamy-chipped-as-hell color). I figured that painting all of the others by hand with a brush was an option, a very clean and precise option, that could possibly take me ten years to complete. Nate says that detaching the radiators and moving them outside for me to get a spray paint assembly line going is impossible, since they weigh a billion pounds and something about draining the water from them, blah blah blah. SO, it was either a paint brush and a thousand hours or attempting spray paint and hoping that I didn't ruin the entire house in the process with the mess.
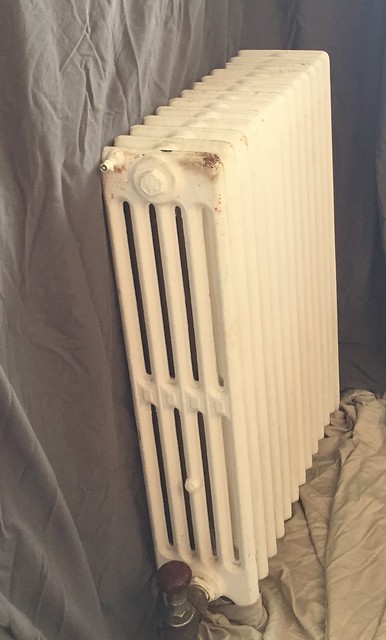
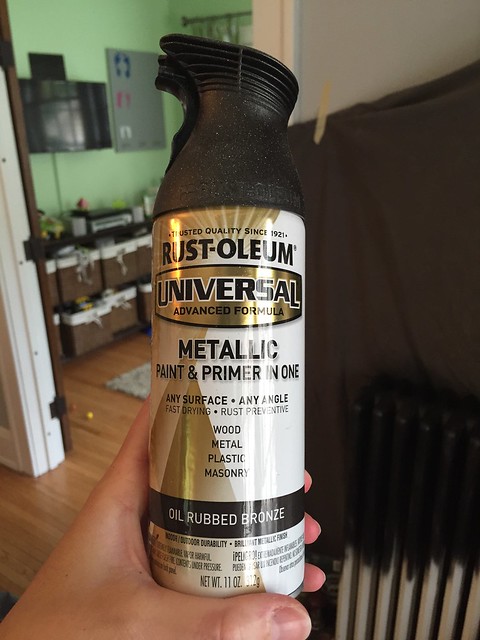
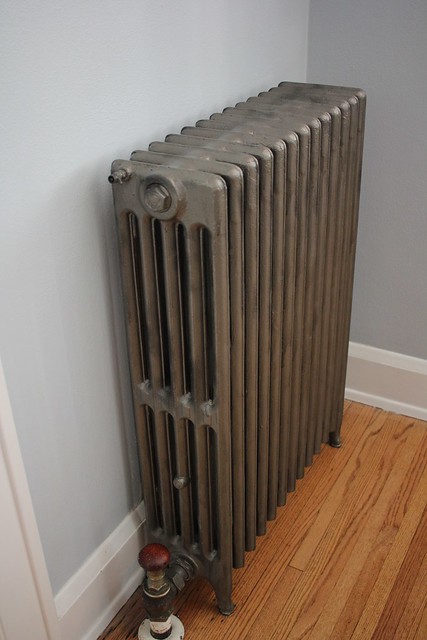
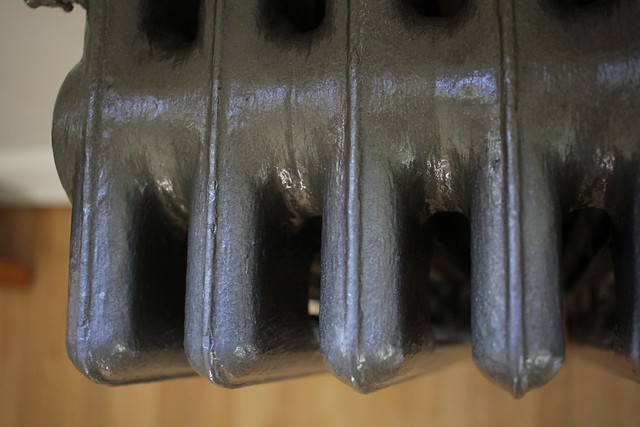
After Porter's party I was staring at my least favorite radiator with disgust, noting the weird rusty/chipped area on the corner that constantly screamed my name as I walked by. I knew Nate wanted to paint (i.e. wanted to have ME paint) the radiators a wrought iron color to match our fireplace and all of the pulls on our built-in buffet, plus a few of our door knobs. I remembered that we had a partially used can of spray paint in the basement from our fireplace project and randomly decided to try it out on Saturday morning.
Tell me that nasty corner doesn't make you want to dry heave.
Let's give this a shot...
I grabbed six drop cloths (which are basically just old bed sheets we've saved for painting projects), put them on the floor and taped them to the wall and tried to drape as much as possible. I should have worn a mask and gloves but I was feeling lazy, so now my fingernails look like I'm homeless and my brain cells have been killed. I DID clean the radiator as best as I could using this super long dusting brush thing, designed for radiators, sort of like this one. I did NOT sand or scrape the old paint because I figured my spray paint was made for metal and had primer in it, and: lazy. I opened every window in our house and placed three floor fans near the radiators and I started to spray the beastly radiator. I tried to corral the stray paint particles the best I could using cardboard beer boxes because I'm classy. I seriously considered creating a giant wall-o-sheets behind me, taped floor to ceiling, to stop the paint mist from spreading everywhere. I'm sure that having fans blowing didn't help the spread of paint but when I turned them off I almost died from heat stroke and fumes. Well-ventilated area? Sort of necessary for this project, I know. I did not make a wall-o-sheets to contain my spray but still think it would be a nice idea for the future if I didn't pass out from the paint fumes.
I immediately thought this was entirely too black for my tastes but it already looked better than the cream. Once I ran out of this can I started brainstorming about a possible color change since I knew I *had* to finish this radiator ASAP or the two-toned look would surely drive me mad. I texted Nate, since he was out with the two older kids, and said, 'I started a project, need to go to Home Depot later.' He didn't seem too alarmed but the kids were VERY perplexed by my choice in home project when they returned from their bike ride with dad.

Before I went to the store to buy more paint, I started becoming psychotic about the black paint landing on the floors, the table, the buffet, etc. I washed the dining room floors by hand, scrubbed the table and buffet, and was finally somewhat satisfied that I had gotten it all before it set into the surfaces too much. It's not that you could see black paint on everything but it was just sort of sticky and dingy looking and I could not handle it! I seriously considered just painting the rest by hand but Nate assured me that we could appropriately clean up any stray paint particles, PLUS I still really did not want to spend years on this project with a brush.
I went to the hardware store later and couldn't find any more of the Rustoleum spray with the trigger. I did find a lot of other semi-metallic options and finally, after texting Nate back and forth no fewer than 50 times, we settled on a Krylon version with a regular spray top button. This is foreshadowing for my complaints later regarding the ease of such spray paints!
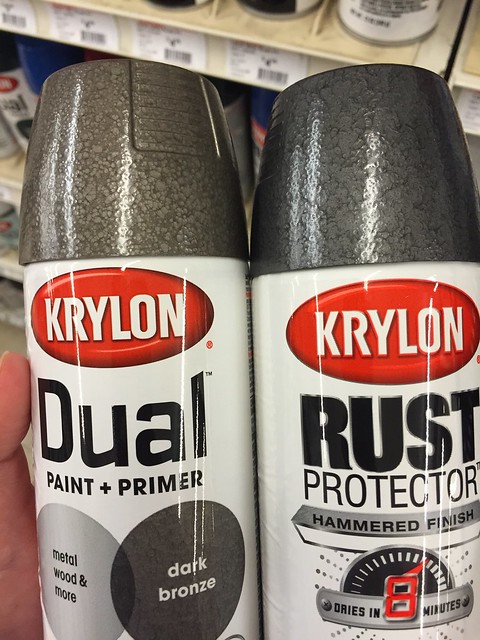
We chose the dark bronze on the left, thinking the hammered texture would be better for our old radiators (can I call them 'rads?') and went more bronze versus silver. I personally wanted a lighter brushed nickel or stainless steel look but Nate was adamant that would look horrible, so we compromised with the dark bronze. I purchased three cans and hoped they would cover my partially finished rad and also the bigger one in the kitchen. I believe each can was a whopping $7, so I'd say this project was fairly economical.
After the kids went to bed, I added a few more drop cloths to the dining room floor and repositioned my fans for the long haul. I sprayed the entire radiator and covered up the previous blackish color, declaring the dark bronze much better. The only thing that sucked (well, not the *only* thing) was that this standard spray can button kept clogging and my wrist/forearm immediately decided to cramp up in defiance. Lots of shaking, removing the little cap to inspect for clogs, and a fair amount of curse words later and the dining room rad had a new coat of 'dark bronze' paint.
It got a little tricky for the radiator feet and the underside of it, but I just did my best to cover everything and then had to use a bit of paint thinner on an old rag to wipe down any mishaps on the floor/walls. The next day I definitely had to clean all of the floors again despite my best efforts with drop cloths and the paint smell was pretty strong at first, BUT still a success. I secretly enjoy the smell of paint fumes anyway, but Nate was not a fan and poor guy had to sit outside with a cocktail while I slaved away indoors.
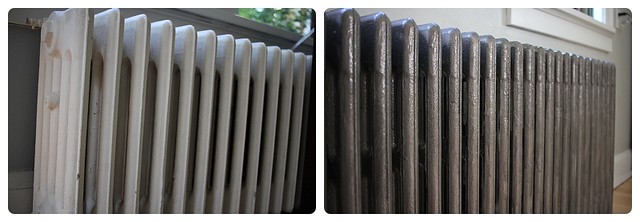
TA-DA!
So fresh and so clean, clean.

Looks like a newer version of these 90 year old beauties, still not trying to be too terribly modern or anything.
Next came the kitchen radiator and I immediately decided to go for it as soon as I finished in the dining room. I definitely made myself a cocktail and turned on some music and tried to force my raw finger and thumb to work again. Same thing: drop cloths, open windows, fans, cardboard to help guide the spray a little, and lots of and lots of shaking. I later found out on Instagram that there is an adapter you can buy to make any aerosol spray can into a trigger mechanism, therefore saving your fingers/forearms. Will for sure be buying one of these next time!
Before:

After (plus sweet Henry):
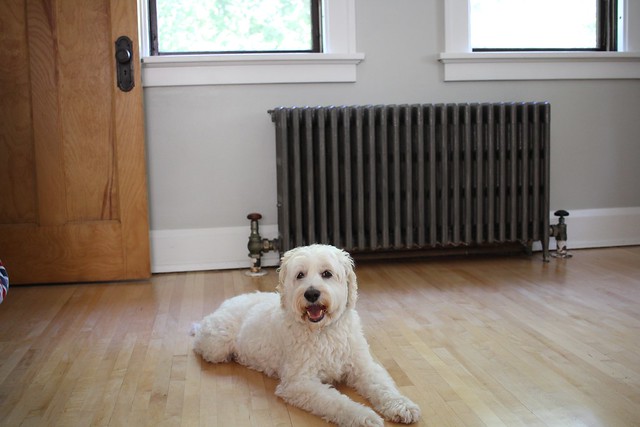
It's not perfect by any means, and it could probably use another full coat on it because there are just so many nooks and crannies and it's hard to get way inside of the radiator. But I like the end result a lot!
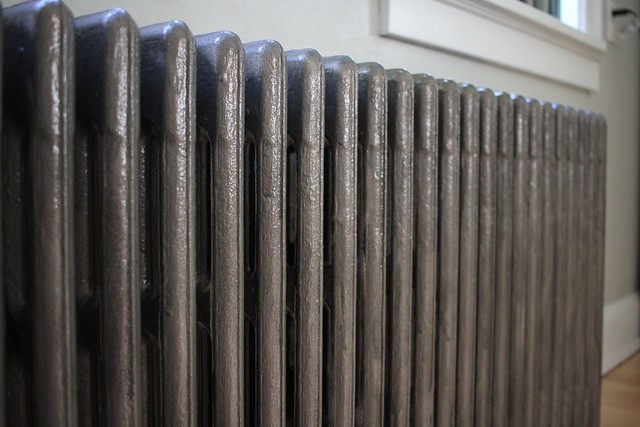
Glad we picked this color, could still be happy if it was a lighter version of this and more silver but at least it's gray-ish and not too gold/bronze, not cream, and not the black that startled me so much at first. And shiny now instead of flat!
So I did both of the radiators in one day, probably about 3-4 hours total?
I think when I buy more paint cans for the other radiators, besides getting a spray can adapter I will also see if I could get a small little 'touch up' size of paint that matches this color so I can brush the feet and the missed spots a little better. We will see, maybe I won't care about the little thin coverage spots over time....or maybe I will;) I'm sure I could get a small pint of this dark bronze color matched, don't you?
Next up has to be this giant radiator in our family room. It's partially covered by the couch but I still want it to match the others now. It looks white here but I assure you it's cream.
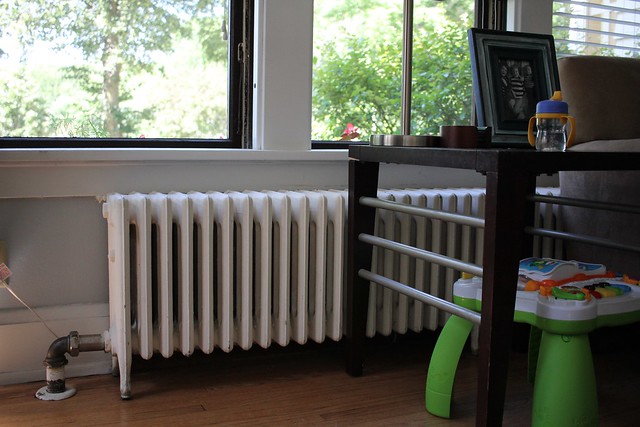
And chipped. And shows dirt like crazy.

Anyway, two down and three more to go on our main level. I don't care as much about the bedroom radiators but don't get me started on the upper bath radiator (hatred!). So I suppose I would have three on the main level and three on the upper level of our house if I was being crazy about all of them matching. I at least want the downstairs to match and I find that I need to plow through these type of projects before I lose steam and don't care anymore, so maybe this weekend? I won't hold my breath if you don't.


thank you so much for posting this. I have 7 chipping cream monstrosities in my house that I need to tackle!
ReplyDeleteThese look beautiful! You painted your trim white too, right? How horrible was that? It's a bucket list project for our house!
ReplyDeleteIt's amazing what spray paint can do - we painted the radiators in our last house and the finish held up fine for the 5+ years we lived with them after painting. A word of caution, since you mentioned fans - we set up fans when we painted ours as well, and the fan near the open window ended up blowing the paint that was in the air onto the window screen, and we permanently had a white circle on the window screen... I didn't use a fan in any of the other rooms after that, and didn't have any issues with the overspray getting on anything else. We just made sure to cover the floors/walls around the radiator really well.
ReplyDeleteWe had radiators in the house that I grew up in. They are great for drying or warming up mittens in the winter. Our cat lived on them, as well. I miss them.
ReplyDeleteThey look great! We bought a total fixer-upper and didn't have the money to totally re-do the kitchen due to many other pressing things so we had to spray paint the metal cabinets (they were bright yellow). My husband did much of the work Nd he went through something like 30 cans of spray paint. He also lost feeling in his finger for a while but it eventually came back. Good times.
ReplyDeleteWow, what a big difference painting the radiators made. They look great! I just love your house. We are in the process of buying our second home and I have a few pictures of yours pinned. :-) It's a ranch style home with a walk out basement built in 1961. It needs a lot of updates, but we're excited to give it a make-over and make it our own. :-)
ReplyDeleteI've noticed that several of my friends in the city have small marble slabs installed over their radiators. This makes them little console tables everywhere and helps cut down on the dust that settles on them.
ReplyDeleteI love how this project turned out!! Have you ever seen those adapters for spray paint? It's like a trigger thing you put on the can and then you just press the trigger and spray, so much easier than pressing the little tab on the cans and you can reuse it on all spray paint cans! I think I bought mine at Michaels in the spray paint aisle a few years ago.
ReplyDeleteTo make touch-up paint out of spray paint, just take a clean yogurt container and with one hand holding a rag over the opening, point the spray into the container for 8-10 seconds. You'll have a small amount of liquid paint that you can dabble a small paint brush into. Clean up with Xylene or mineral spirits (read the 4 point compressed font on the paint can for which is most appropriate, or get the technical specifications from the manufacturer's website and then you can zoom in on the PDF to actually read it.)
ReplyDeleteFor those floor escutcheons -- they look like the old metal style and not the newer PVC ones in big box stores -- they "open" by finding the split opposite the hinge, and lifting one side or the other. They're held together by a tab or tabs, similar to a cereal box top -- except these are vertical tabs. I took mine off, stripped with Soy-gel (hint: apply Soy-gel, wrap in plastic & tape shut for a couple days, then wipe off with a wet rag dipped in a mild degreaser solution), sanded the rust spots with 600, 1,000, 1,500, & 2,000 grit sandpaper, buffed on a buffing wheel, then protected with Mother's synthetic car wax.
Or instead of buffing to shiney metal (mine were nickel plated), sand off any rust with 220 grit and rough up rest of finish, prime & paint with same paint as radiator.
With a lot of plastic, tape, and some craft paper on top to absorb spills, I stripped the supply & return pipes with Soy-gel (wrap & wait a couple days), sanded with some 220 grit, then hand brush primed & painted with Rustoleum Painter's Touch Oil Rubbed Bronze. It's almost black, and when the light hits it, you can see some bronze flake (very tiny).
My supply valve and return elbows were nickel plated brass, so I just stripped, polished & waxed.