
I didn't really think it would take me this long, and it probably wouldn't have----but I kept getting distracted, doing other projects instead of this one. Nate is really really happy I finished this beast so that we can have the top of our built-in buffet back now;)
Ta Da!
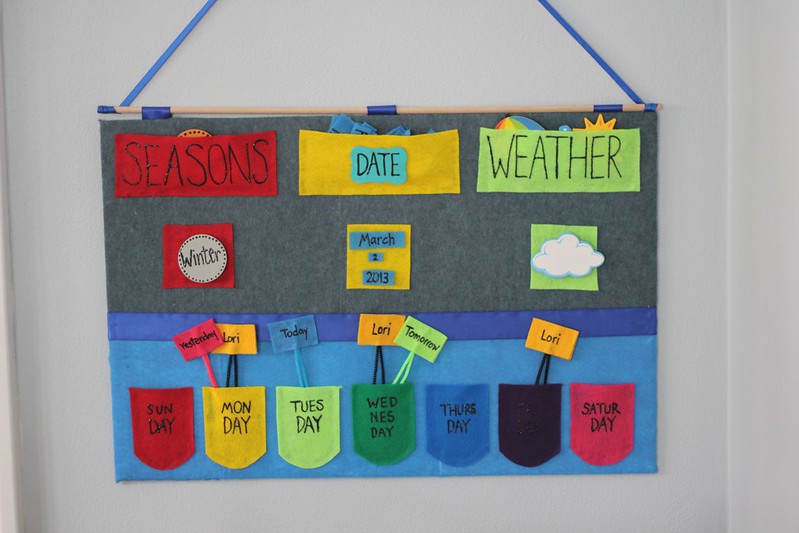
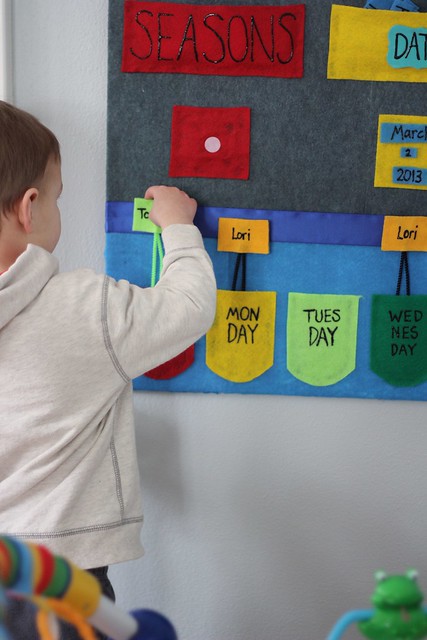
So I was just going to buy a felt calendar that I saw on Pinterest, but then I realized that it had features I didn't really want or need (ie 'feelings', activities, etc). And I wanted this to be mostly focused on the idea of a time concept: something to help Truman with figuring out which days he will go to Lori's, and what day of the week it is. Hoping this helps him understand when mommy and daddy are working and when we get to be home together as a family, but we will see.
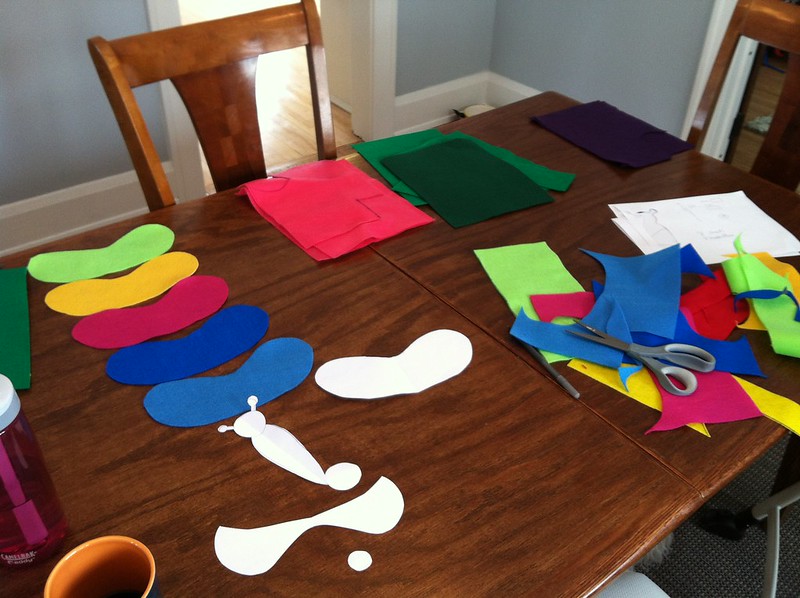
So I figured I would use felt for something fun and different, since I've never worked with it before. I found a big poster board at Michaels, a bunch of felt, a fabric pen, and some ribbon with a dowel rod. I already had pipe cleaners, so I chose to use those instead of popsicle sticks (but maybe someday I will have to upgrade). I do not sew but if I did I'm sure this would look a lot more professional. But my hot glue gun worked just fine for what I wanted to accomplish.
The hardest part was covering my poster board with felt. I wanted it to be two colors and not just plain white, so I did it in blue and gray, with a ribbon dividing the two. Then I added the dowel rod on the top using ribbon, so I could hang it up.
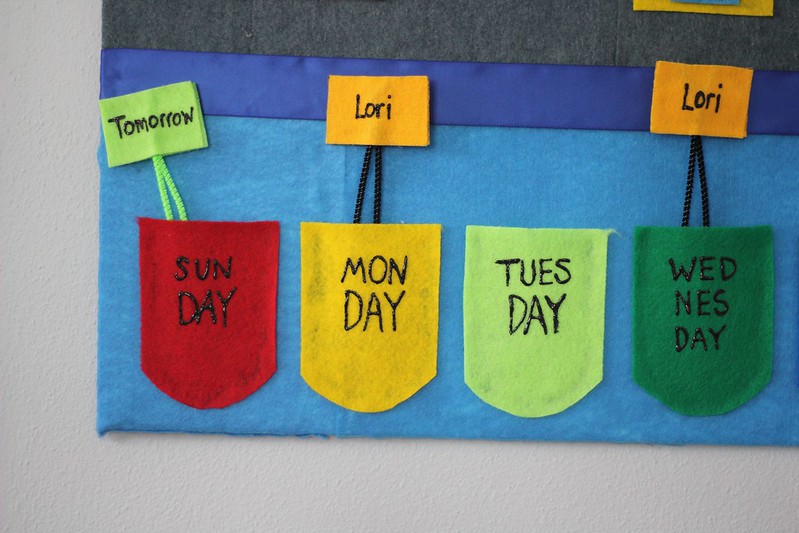
I made my days of the week into little pockets, wrote the names with my fabric pen, and then created my 'sticks' for Yesterday, Today, and Tomorrow....plus three 'Lori days' in there, too. It's been fun having T move the days around and he already kind of understood that 'today isn't a Lori day' but was able to point to Monday as the day we go back to work. It's hard to figure out sometimes, buddy--my days blend together, too.

Then after my days of the week, I didn't really care which topics we covered. I found some really cute cheap wooden shapes at Michaels and decided to do weather, seasons, and the date. Truman has been into telling me if it's nice outside, or cold, or sunny so I figured he would like the weather and seasons.
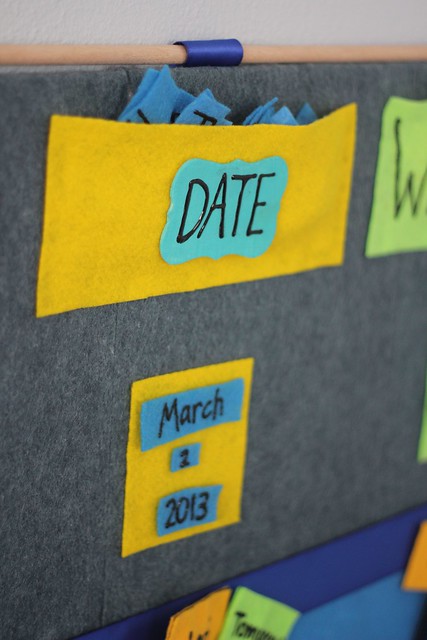
For the date I wrote on a wooden shape and hot glued that to a pocket I created, where I will keep all of the months, dates, and years. I wanted to just stick those felt pieces directly onto the yellow felt square but they didn't stick as well as I'd hoped. So I just used a little bit of velcro on the square to hold the tiny guys on there. Did NOT go through the trouble of adding the velcro backing to each of the dates. No way, man.

For the weather pocket, I found cute shapes at Michaels again--a snowflake for when it's (always) snowing that I had to paint, then an umbrella that was painted already for rainy days, a painted cloud for overcast days, and a painted sun for sunshiny days. Come on sun, let's see you again!

I added velcro to the square and also to the backs of each wooden piece for this one.


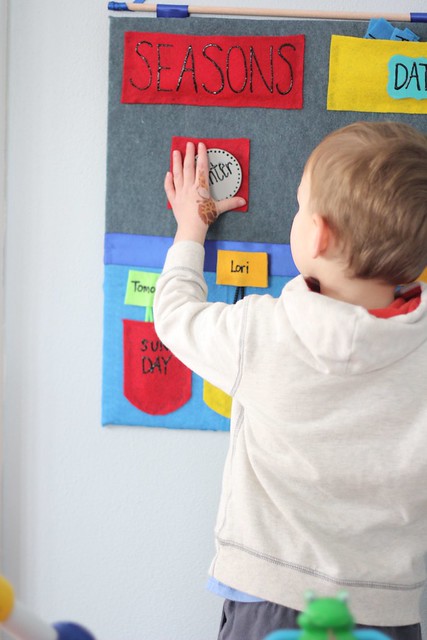
Then came the seasons---just four wooden circles that I painted and wrote the names on with my fabric pen. These are also velcro'd on to the felt square.
Seems simple enough, I suppose. All of the cutting of the felt was tedious, as was the enormous amount of hot glueing. I didn't mind the painting and using the fabric pen but when you put it all together, it was a lot of work! I hope it holds up for us and I hope Truman enjoys using it each morning with me. I made years '2014' and '2015' for our dates---hope we need to use them someday! ;)

Since I couldn't get enough of that awesome feeling felt gives when it sticks to my horribly dry hands (gag), I decided to do another felt project. This one is for a blogger busy bag swap, which maybe will get it's own blog post in the future.
If you haven't heard of a 'busy bag' project, the basic concept is that you have a ziplock bag that contains an activity for your child to do on their own. You will have to show them how to do the project the first time but then after that, they should be able to play independently with the activity to keep them busy. Genius. Pinterest has about a billion ideas for busy bags and I feel like it's almost overwhelming to even look at all of the busy bag boards!
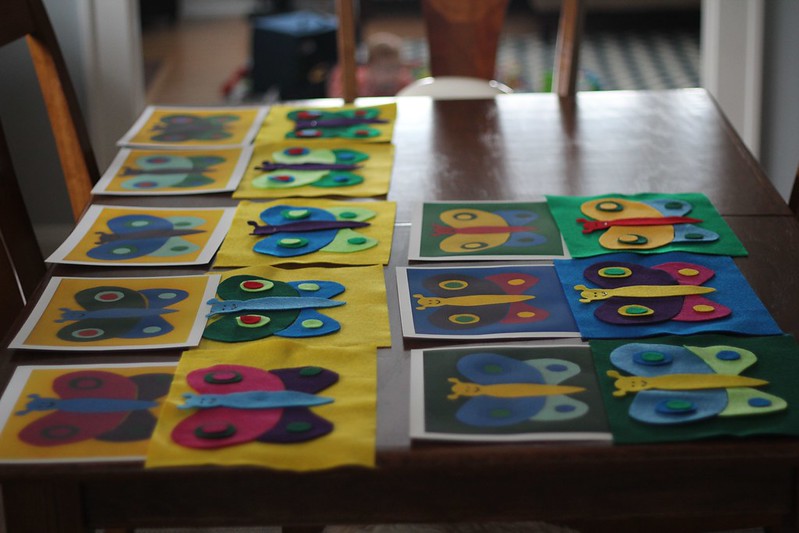
After pinning tons of ideas for this project, I settled for this Butterfly Symmetry busy bag activity because I knew I wanted to use up the rest of my felt and it seemed pretty fun.
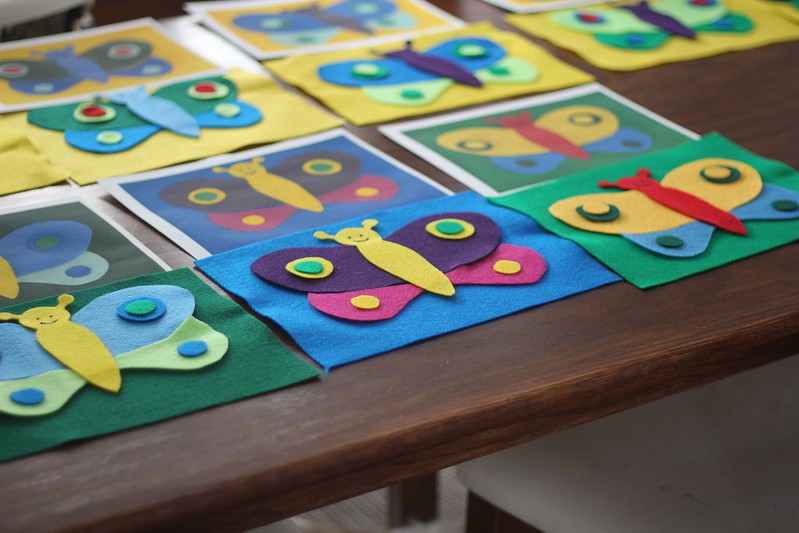
There are a few ways to do this project with your preschooler, and I wrote out instructions in each ziplock bag that contains the butterfly activity. The original link says to build the right half of the felt butterfly to mirror the left half 'template' on a sheet of paper. But that seemed pretty advanced to me, so I just made the whole butterfly with a whole template. I thought that the first 'level' could be the child creating the butterfly right on top of the printout template, like a puzzle. The second level, once the first gets too easy, would be to move the template off to the side and build the butterfly on top of the large piece of felt by glancing at the template but not putting the pieces directly on top of it. Still kind of like a puzzle but maybe a little bit harder? Then once that is too easy, the third level would be cutting the butterfly in half, and cutting the template in half. Then the child can build a symmetrical butterfly using that half of a template. The link said a 4 years old could do the half of a butterfly, and a 2 year old can just build the whole thing without worrying about symmetry.

Here is how I made these babies:
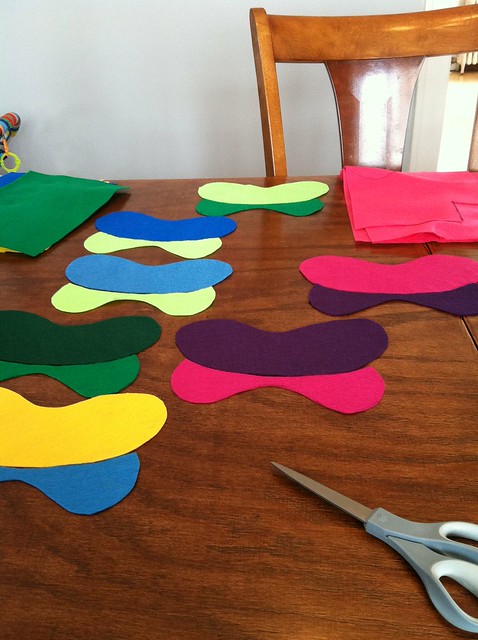
1. I made my own butterfly template out of paper, after looking around online for inspiration.
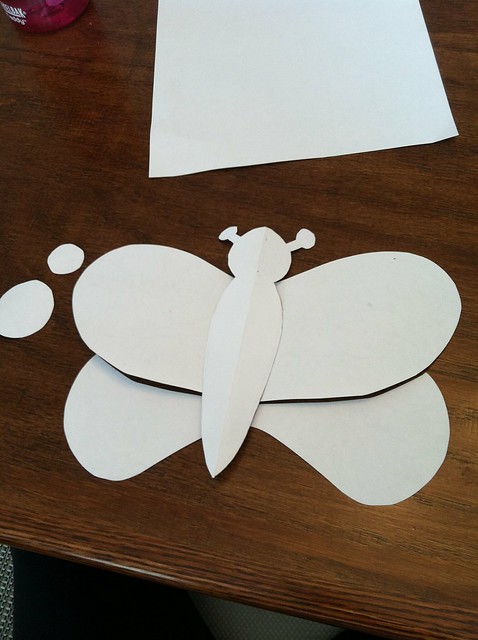
2. Then I cut out each piece using different colors of felt.


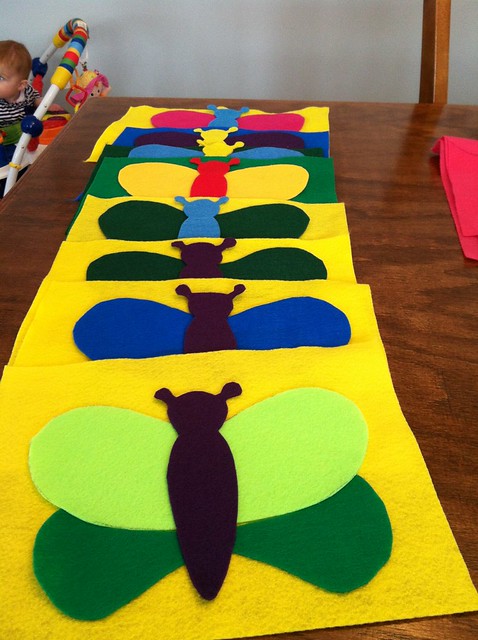
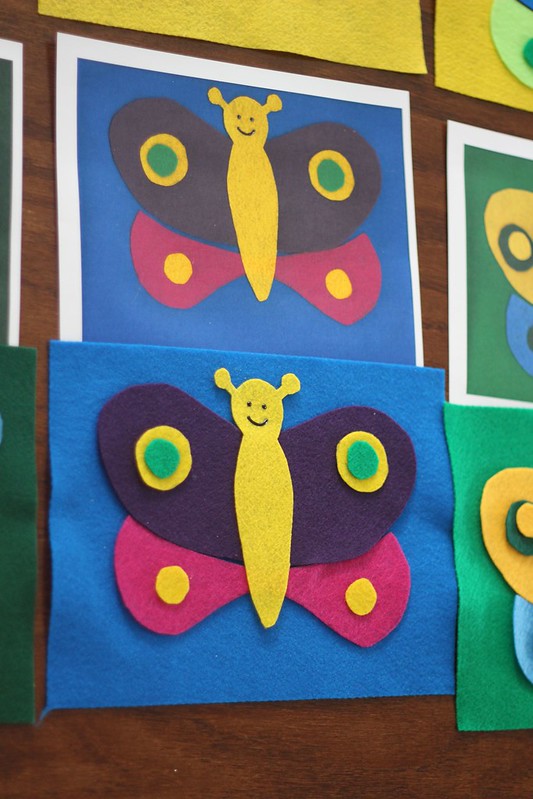
3. I added a little face on the body with my fabric paint after Truman requested that the butterfly have a smile;)

4. Then I scanned each completed butterfly on our scanner and printed out that image onto photo paper. I know this part isn't really necessary and I think the original link even has a template to use and print. But for some reason I thought this would be easier in the long run.

And ta da! 8 little butterflies ready to go to their homes.
I'm excited to get different busy bag projects back in the mail, too---and Truman already enjoyed playing with the butterfly in his own way (ie creating his own butterfly that was anything but symmetrical).
And that is how I spent the last 2 months working with felt. Whew.


Thanks for posting this with such detailed instructions. I haven't even begun to look into how to make one to this extent but this will be a great place to start!
ReplyDeleteI have been scouring pinterest for a daily thing like that and haven't found anything I like. BUT, I think I've found it now! LOL. Since my boys go to daycare 3x a week we also struggle with which days are stay home days and which days are work days. YESS, so excited. Thanks for this!
ReplyDeleteSuper cute and such a creative way for T to learn! Happy belated bday to the little man too, your post had me crying!
ReplyDeleteBoth projects are adorable! I should make some busy bags for Lily, maybe it would get me out of playing so much dollhouse ;)
ReplyDeleteLove it! Totally stealing the calendar idea someday. I remember having a very similar one in preschool (owned/run by my mom) and I loved moving the pieces around so much!
ReplyDeleteThis is great! I was eying all my felt this week and pondered a DIY planner board for Bella once more but I'm going to take the lazy route and buy that one you pinned (I pinned it a long ago, too). I don't love it, but it will be good enough and better than the $1 paper one we have.
ReplyDeleteBusy bags! Brillz! Will do that with Bella once her tv time is up.
That calendar is INTENSE. I love it! The one I made was a lot easier, but definitely will fall apart, and cannot be within Luke's reach. Have you had to keep Cece away from this? I just imagine Luke standing by it, taking everything off, and eating it. That's what he does with ours so I have to hide it and thus forget to change the days most days anyway. Oh well. Best intentions and all that!
ReplyDeleteBeautiful! You are so crafty! I'm going to try to make one next year. Henry is still too little i think.
ReplyDeleteThe calendar turned out GREAT, Julia!! And I LOL'ed about your dry hands against the felt. CANNOT STAND THAT FEELING!!
ReplyDeleteFunny story about the premade calendar you considered ordering. I bought a premade one and was deciding between the one you linked and another one. I asked Chad's opinion - I liked the "feelings" one, but it was $10 more than the other one. Chad thought I was a total loon for wanting to spend $10 more on a calendar just because it asked how Isaac was feeling. So I bought the cheaper one. And now, every time Chad is home when we do Isaac's calendar, he'll say "How are you feeling, Isaac? There's your ten bucks, Kristal." HA!!
I LOVE the calendar! We get those Q's all the time - is it a Momma Day? A Nonni (daycare) Day? Is it Daddy Day? Something for me to think about around these parts.
ReplyDeleteI have to ask: did you pick those scissors up at HOBO? because we have two pairs in our kitchen, just like that. haha
Holy moly you are one busy lady! Great job on both projects. ;)
ReplyDeleteThis is absolutely amazing! I love everything about this! Reminds me of school days when I was a kid. SO MUCH FUN!
ReplyDeleteLove the butterflies too! Very cute!
Photo learning, oh I wish you were my teacher in every grade of school ever haha! Thanks for sharing your work with us:)
ReplyDeleteInviting you to my Spring Bash with Close To My Heart, info here on my blog!
http://www.creativelyredeemingher.blogspot.com/2013/03/invitin-you-to-my-spring-bash.html
I love that calendar. Such a great idea to help kids learn days of the week etc. nice job!
ReplyDeleteLove this calendar!! So cute!! I think I am going to have to try :)
ReplyDeleteI just wondered if Truman is still into this now, and it's still used, or if he kinda "got over it"? Trying to determine if it is worthwhile to make one of these for my 3-year-old who is currently all about knowing "how many Mary days" (daycare) are left until the weekend.
ReplyDeleteHeather--he loved it for a solid 3-4 months. But it's in the basement now:( maybe Cecelia will like it in a bit? Still glad we used it a lot back then. It did seem to help.
DeleteI found your post on pinterest and was ecstatic when I did! Thanks so much for the idea! I made one too, with a few minor tweeks. http://adultversionofme.blogspot.com/2014/05/days-of-week.html
ReplyDeleteThanks for sharing:)
I'm a digital scrapbooker so I made my days of the week calendar on the computer. You can see it on my blog here: http://inourpond.blogspot.com/2015/04/circular-calendar-for-children.html
ReplyDelete