
Reader question #1: from Trisha, "How do you set up Google Analytics?"
1. You need a Google account, so set up one of those puppies. I'm pretty sure that means you just need a gmail address.
2. After setting up a gmail account, you'll need to go to http://www.google.com/analytics/
You'll follow the prompts to sign up for a new account.
 3. Fill out the general information, contact information, and user agreement. Copy the code they give you.
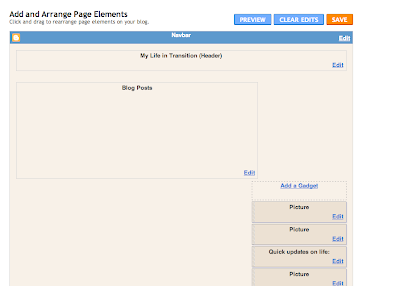
4. Now the tricky part: adding the code to your blog. If you have a blogger account these directions should work: log into your blog. To go "Layout" then "Page Elements." You will need to add a "Html/Java" element to the bottom of your page. There is mine after it says "Add a Gagdet"
 5. Paste the code you got from GA into the content section. You can leave the title blank. Hit save.
 6. Go back to GA and follow their prompts. It's going to take 24 hours for the code to be detected. Once it's working you will only get results every 24 hours, from the previous day. Does that make sense? If you don't think it's working, check out some of their help articles like this one.
Question #2 from multiple readers: "How do you make your blog headers/beautify your blog?"
Well, ladies...my secret for this one is a lot like my secret for album design. I use Photoshop CS. It's an expensive and intimidating program that I have grown to love. I bought a big fat instructional book that is itself quite overwhelming and gradually over the past year I've taught myself quite a bit. I'm sure that you could use another design program instead of Photoshop if you'd like, but I will quickly go through some basics. If I had free time I would offer my services for making blog headers but I'm already spread a bit too thin right now. Perhaps someday:)
Beautifying your overall blog: I got all of my hints from Suzanne Hart at SJH Blog Design. I used to have her linked on my sidebar but lately I've been doing it without scrapbook papers, so I deleted the link. Perhaps I should re-list it again, huh?
Now when you read her instructions you might feel a little overwhelmed which is completely understandable. Take your time, and do this on a day when you have patience. :)
One big tip: you need to set your blogger template to one of the Minima layouts. I prefer the stretch version because I like the wider style but choose whichever you please. Then you will need to pick your papers/colors for three parts of your blog: the center column where you write your text, the outer bars of your blog, and behind your header at the top of your blog. Choose scrapbooking paper if you'd like---there are many fabulous sites that offer freebies if you just want to play around a bit. Some of my favorites are: Jen Wilson Designs, Shabby Princess, and Two Peas in a Bucket. There are probably a bajillion more companies out there but these are the ones I frequent.
I like to choose a plain paper for the center column then go a bit more crazy for the outer bars and the header. Follow Suzanne's instructions for adding the papers and you can't go wrong. I even emailed her a question once and she immediately responded with helpful information.
Lately, I've been making my own colored backgrounds via Photoshop. You can do that by making a jpeg image of any size because when you upload the jpeg to Photobucket, it will repeat the image over and over again until it fills your blog. Just something to keep in mind.
Headers and Buttons:
This is all Photoshop, but like I said I'm sure you could use another program to make your own versions. If you find some cute digital scrapbooking paper on one of those sites you can start with that. I am a big fan of digital 'embellishments' like the frames I'm using right now on my header/buttons. Pretty fonts will always get my vote, too. If you want to add a picture to your header just make sure to save the original as a jpeg and make it fairly small to fit.
The sizes of files you will need to create: for the header=760 pixels X 250 pixels [at least that is what I use]. For the buttons on the sidebar=150 pixels X 100 pixels. This can change depending on how big you want them.
Once I design my header, I add it to my blog by going to "Customize" then "Page Elements" and then click "Edit" under your header. You need to make sure you place the new image instead of the title and description, and don't shrink to fit. Save, and voila...you have a new header.

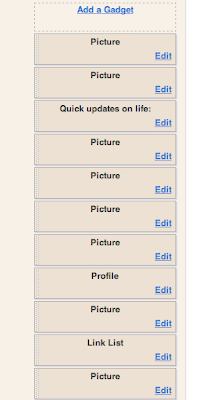
Once I design my buttons, I add them just like above but I will add a page element on the sidebar called "Picture." Again, make sure you don't shrink to fit and save it once you've uploaded the jpeg. You can drag and drop the proper button into place once you have them all added. You'll still need your lists, and links, and other fun gadgets on the sidebar but your button will just be a separate 'picture' above each element. Does that make sense?

Sorry I can't help with the specifics of design, but those of you with Photoshop can email me if you have questions as you go. It's a ridiculously technical program and I don't want to bore the rest of you non-PSers out there but it's really not too difficult once you get the swing of it!
I have another post in the wings for DIY projects unrelated to the computer, so if this isn't your thing maybe REAL crafts will be:)
I have another post in the wings for DIY projects unrelated to the computer, so if this isn't your thing maybe REAL crafts will be:)


I also love Designer Digitals (designerdigitals.com). You wouldn't guess it from my sad header, but I used a lot of their graphics and embellishments for wedding stuff.
ReplyDeleteI have Photoshop Elements which is a lot less intimidating and expensive than CS. If anyone is just starting out, and is interested in design as well as mastering photos, but doesn't want to invest too much - this is a great program.
If you are only interested in design, I think Microsoft Publisher is a great design program for beginners.
one more thing - I second the recommendation of Suzanne Hart's blog. It is VERY helpful and easy to follow, IMO.
ReplyDeleteI also love how you said "does that make sense" 397 times.
Julia, that was incredibly helpful!
ReplyDeleteI had no idea you added your header and buttons like that... I thought you had to do it in html, like all the papers!!
Thank you, thank you!
I may just be able to do this afterall..
I signed up for Google Analytics when you talked about it the other day. It's great! It gives SO much information.
ReplyDeleteJust found your blog via some random blog reading.
ReplyDeleteI, too, love my Google Analytics :)
Can't wait to come back and read more!
Hm, I may just have to check out this Google Analytics thing!
ReplyDeleteThank you SO MUCH for explaining the analytics thing! I installed it last night and I'm already getting stats! Yay! You rock!
ReplyDeleteI'm waaaaaay overdue, but congrats on your blog anniversary! I can't believe how much your readership has grown in a short year. Definitely don't give up the blog! You would have a lot of disappointed readers!
ReplyDeleteWhoa! I think I'm going to take some vacation time now and just spend some "cuddle time" with my blog among other lovely technology that I have yet to explore.
ReplyDeleteI never realized how in depth Google analytics was...I always thought my blog stats through wordpress were nice.
THanks, feel free to keep sharing your amazing-ness!