
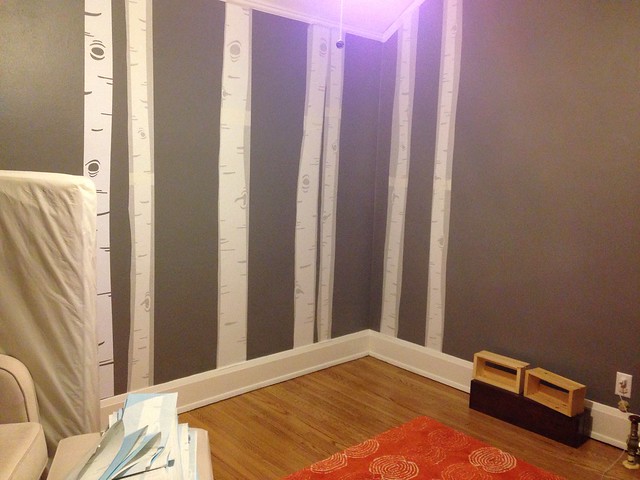
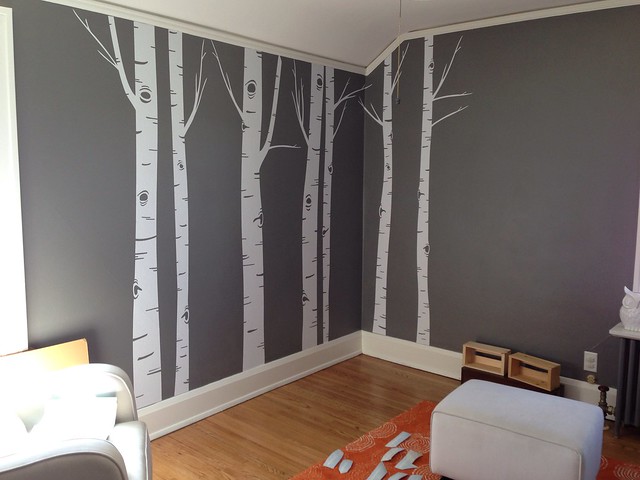
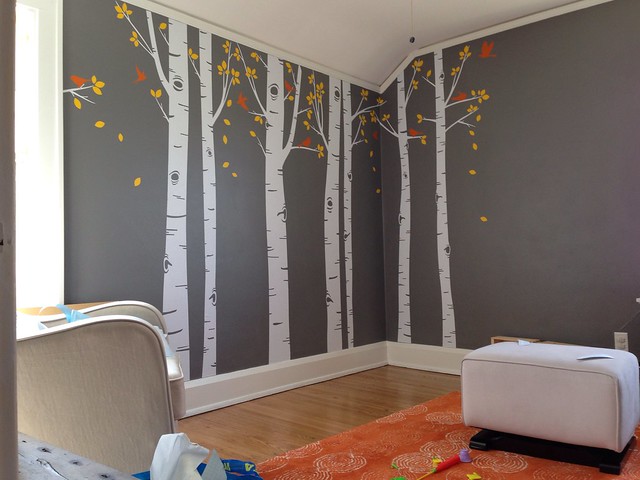
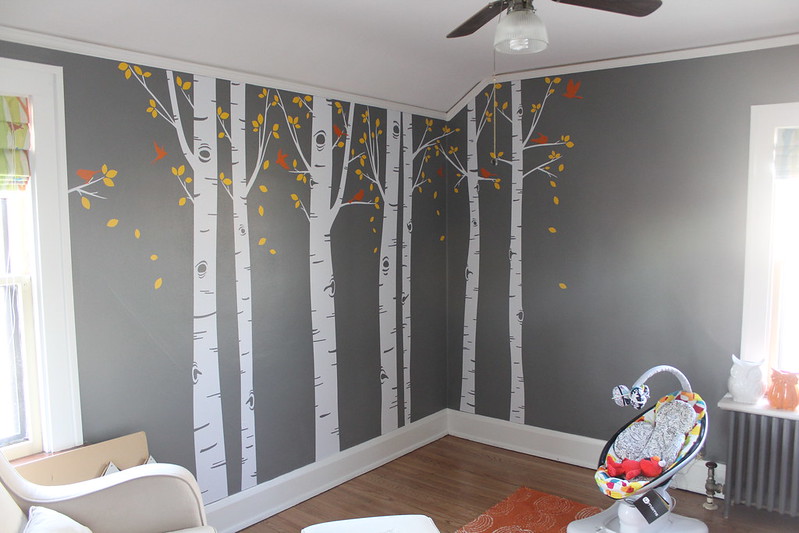
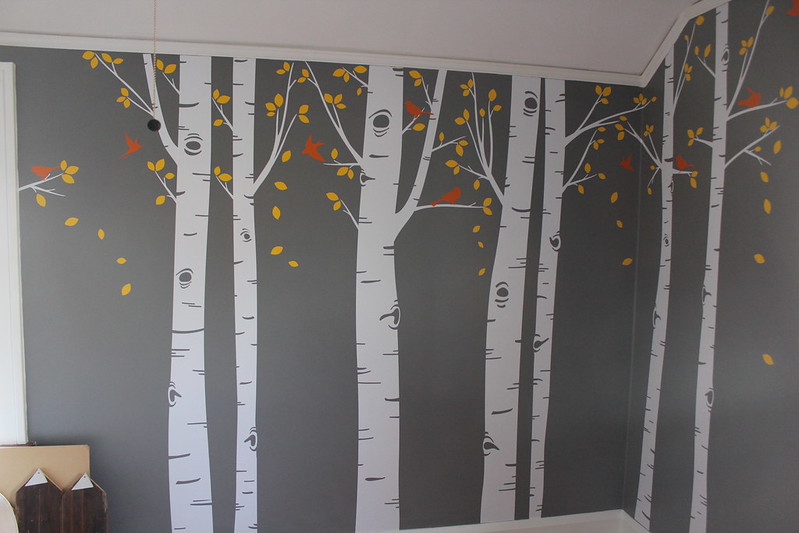
First up: his birch tree wall decals. I think these are going to be a major focal point for the room and because they took five times as long as I expected, I think it's worth a blog post to commemorate.

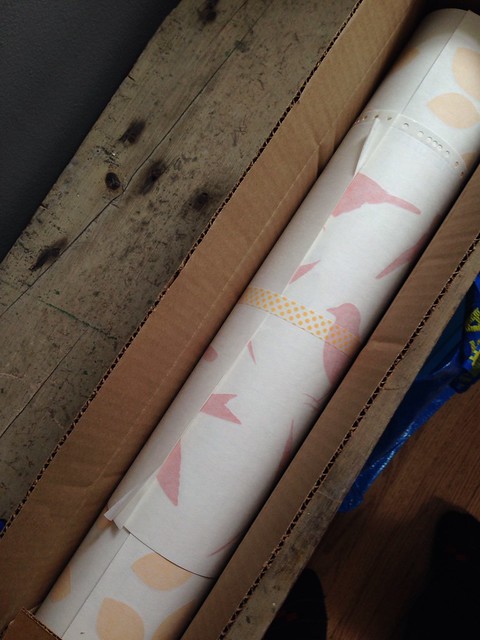
After doing a lot of Pinteresting research on the numerous options for birch tree decals on Etsy, I ended up selecting this version from InAnInstantArt. There are 7 birch trees, 9 birds, and seriously 100 leaves. I liked having the option of picking three total colors instead of just two colors, so that it could pull together both the yellow and the orange I had planned for his room. I knew I wanted bright white birch trees, more than one color after that, and really liked the style of this seller's trees. So with shipping and everything, this set was $109 total and took a few weeks to arrive at my doorstep.
I also loved this version with owls and an adorable birdhouse, since it allowed for 3 colors, but I thought maybe it was too juvenile (for a nursery.... I know, I don't make sense sometimes) and wanted more trees. This was another favorite since I love how the leaves are all very high and clustered together, and I'm pretty sure this pin was what inspired me to try a few 'falling leaves' on my wall. This one was also really cool and simple/clean, with adorable birdhouses. In the end I'm very happy with the version I chose but there are SO many other options out there! I read a lot of reviews on Etsy, too, to make sure my seller was highly rated and that the process would be relatively painless for application. And that the decals would actually stay on our plaster walls....that would be awful to see them peel away after a few weeks or something!
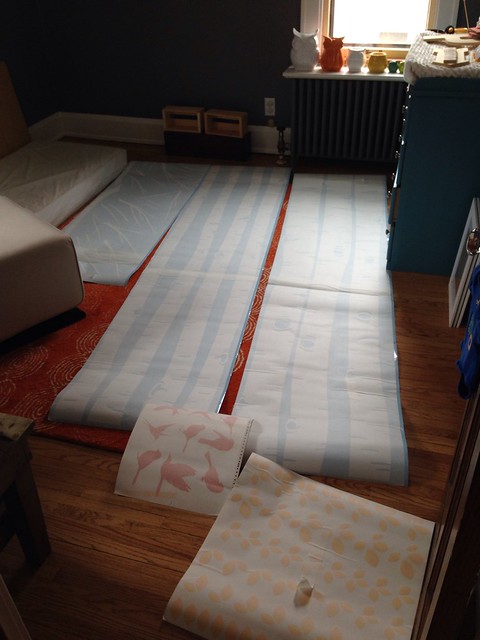
When my package arrived at our doorstep, I was seriously pumped up and took the box to the nursery immediately. I remained very excited until I finally pulled all of the sheets out of the box and laid them down on the floor. Seriously. Overwhelming. Not really sure what I expected but these decals seemed huge and daunting and like I would never complete the task of application. Then I read the instructions and found them to be three pages long and started muttering curse words under my breath. I think I was picturing something I could just peel off and stick onto the wall, but not so much!
Next step: of course I Instagrammed my mixed emotions about the project ahead of me. I had a few suggestions, including a lot of girls who said this would require two people to complete. Since I knew Nate would be gone until 9:30 pm that night and I had about an hour to spare before picking up my kids from daycare, I figured it was going to be a solo project in the name of getting it done STAT. I just get anxious to see the vision come to life and felt up to the challenge of doing this alone because I'm impatient. And I truly had no idea when Nate and I would be able to devote time to this project together, sans kids.
I read the instructions a few times and decided to just freaking go for it (#impatient) my own way. I cut out all seven of the birch trees so that I could place them all individually on the wall without the backing. Again, I just dove into the process and tried to picture how I would space out the different trees, which were all different widths.
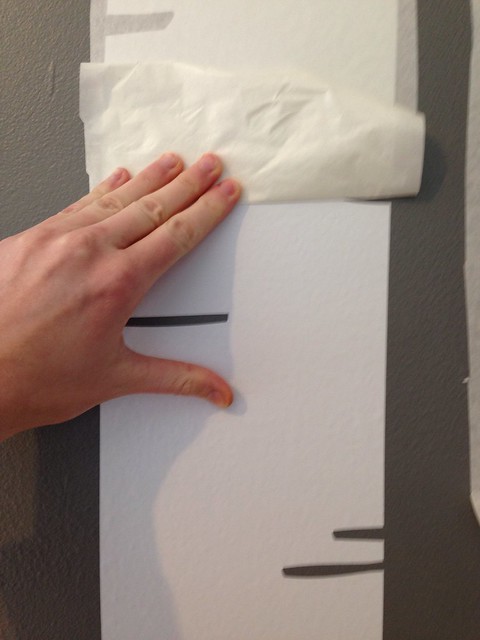
I started at the baseboard and peeled away the non-sticky, blue backing paper as I pushed the decal itself and the sticky, white transfer paper onto the wall. Lucky for me, the trees are all a little crooked and you don't really need them to be 'perfect' when it comes to lining them up. I did try to make the base as straight as possible against my baseboard, though. These trees are all 101" tall which is more than I needed, so when I got to the top of the wall I just cut the decal off with a little to spare above my crown moulding.
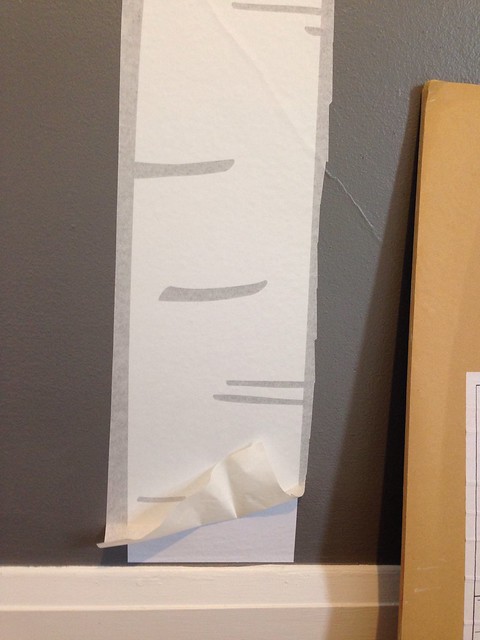
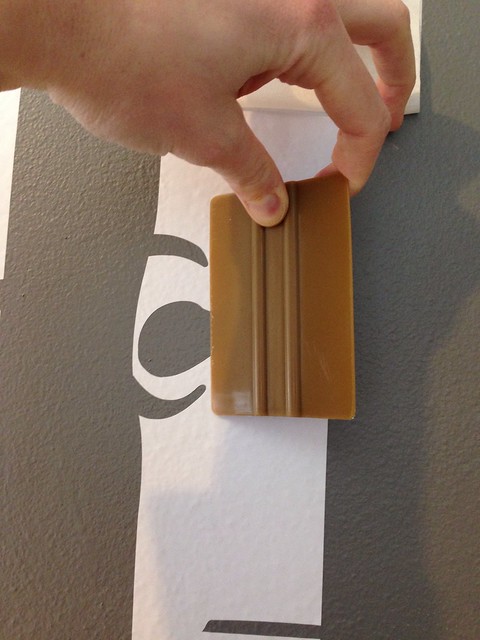
Once each tree was stuck to the wall along with the transfer/sticky paper, I went back over them and pushed them down with all of my might. So basically I rubbed my fingertips raw within minutes since our plaster walls are sort of textured. Once I was sure that they were not going to sag right off the walls, I started the painstaking process of removing the sticky white paper from the decal itself. This was not easy because the transfer paper is sticky and therefore stuck to the decal itself---which I guess is the point, so that it holds the decal in place on the wall first? I don't know. But I figured out the way that worked best for me---which was not at all what the instructions recommended.
I found that pulling the sticky paper directly up towards the ceiling while rolling it away from the decal would keep everything in place the best. If I tried pulling the paper away from the wall, aiming it towards me at a 90 degree angle, it would pull the decal too much and wouldn't work correctly. But rolling the paper up, right against the wall, aimed to the ceiling worked well. I would push the decal down with my fingers as I rolled the paper away. The little birch bark cut outs were challenging but were easier to manage with practice. I also had one of the $1.50 squeegees that the seller offered to help smooth out any air bubbles in my decal. That was fine but I preferred my (raw) fingertips.
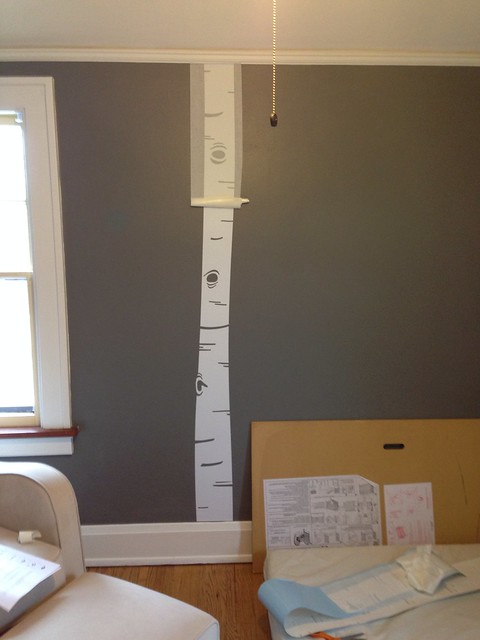
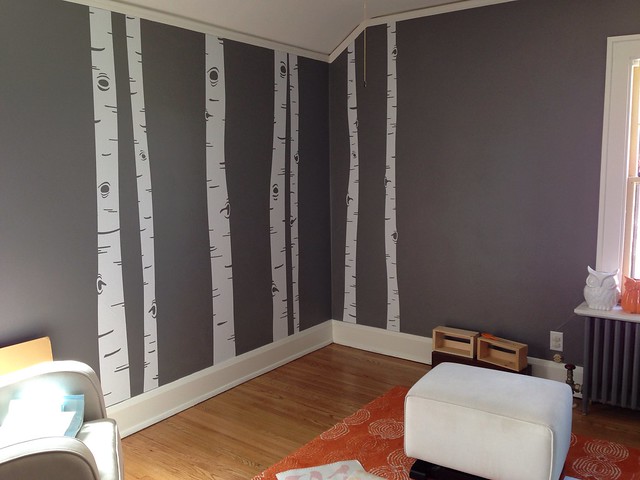
Working my way from the bottom to the top of each tree was okay, but later on I discovered that going from the ceiling to floor was probably better. Both ways sort of sucked and my shoulders/neck were really sore for a few days after this. But! Once the seven tree trunks were on the wall? Glorious. I decided to wrap the trees around to the second wall, since they will surround the crib a little bit more like this. I could have just done the main wall with all seven trees but like the effect of surrounding my little guy in a forest.
I just had to use the end of my scissors to cut off the top of the decals at my ceiling and then I went back over each tree trunk with my hands to smooth them out. Honestly, even just doing the trunks without any branches or leaves or animals would have been really cute. But of course I had to use all of the decal set provided to me for the full effect in this nursery, but maybe even for our master bedroom someday---just tree trunks would be great.
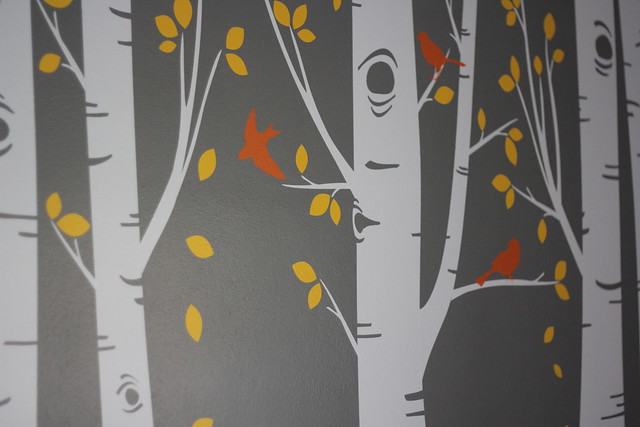
Next came the branches. There were a LOT of branches and I didn't even use all of the smallest ones. I started with the two really big branches, after cutting most of them away from each other. I put the branch where I wanted it on the wall, peeled away the white sticky paper, and that was it. MUCH easier than the larger trunks, thank goodness. Then I started adding smaller and smaller branches to each of my trees. This was easy as far as actually applying the decal. Just hard to decide where to place them---definitely a creative process! I liked some of the options on Etsy that showed branches being up very high on the trees, instead of going all the way down half of the trunk. I tried to keep it fairly balanced without being too perfect or symmetrical. This part was really fun for me and I had a lightbulb moment about the name of my Etsy seller. It *is* sort of like creating art on your wall....just not in an 'instant.' Ha.
Then came the leaves. Because there were seriously 100 of these babies, I think I was most overwhelmed with them. But most were arranged in clusters of 4, 3, or 2 instead of being all individual. I cut out most of the clusters from the rest and left the individuals on the blue backing paper. I could even peel each leaf off the sticky paper with my fingers and just apply it to the wall without using the paper as a guide. That was the nice thing about the small leaves---very easy to stick on the wall.
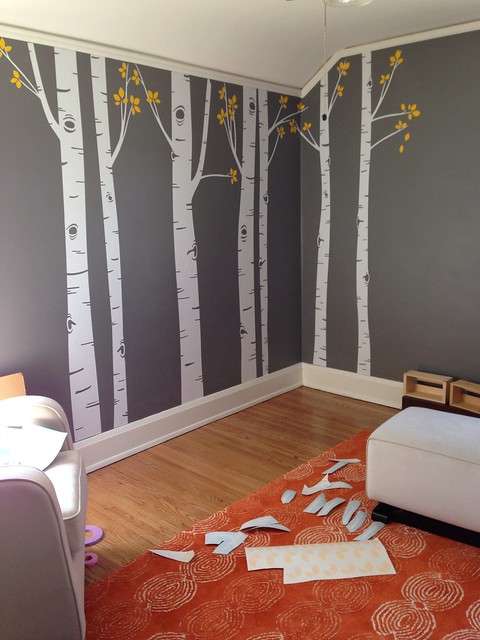
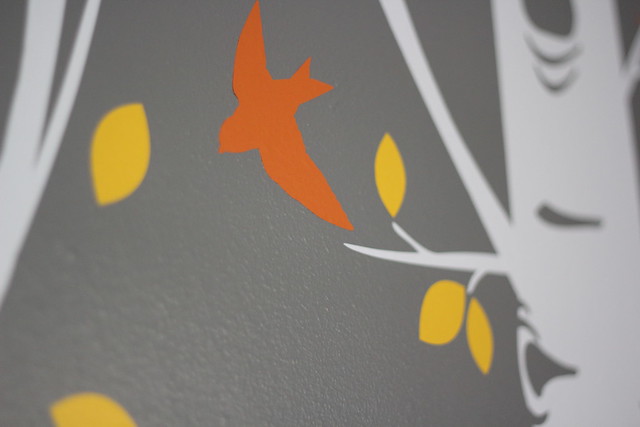
I started with the quadruplets and applied those first, then did the triplets, the doubles, and finally added a few random single leaves. Eventually I re-did the leaves and removed all of the foursomes---it just felt like too many leaves by the branches to me. This part was also pretty fun since there is no right or wrong way to do it! I knew I wanted a few leaves falling from the branches, and it was Nate's idea to make a little branch popping out of the window frame with leaves. Great touch, Nate!
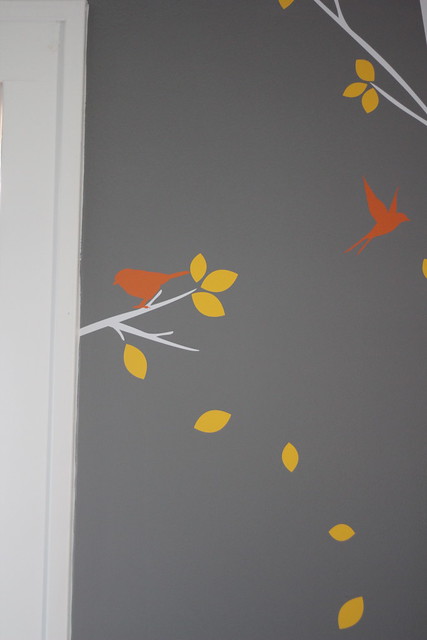
Finally we applied the nine birds and Truman/Nate both instructed me where to place each of them. I mostly just wanted them to be balanced across the trees and was glad some of the birds were obviously flying in their silhouettes. The flying birds and the falling leaves are two of my favorite parts of the layout---something about showing movement or making it more whimsical versus static?
The entire process took somewhere between 6-8 hours I'd say. I lost track. But really, it was only Friday through Sunday so not *that* bad, since I prefer most of my projects to take no more than one weekend;) I did it all myself except for the suggestions given to me by my boys at the very end.
Nate's first question was 'if they are this hard to put on, are they going to be difficult to take off?' The answer is 'no', they will be easier to peel off but I DON'T plan on doing that ever! Seriously. If CC uses this nursery someday for herself, and the boys share Truman's room, Cecelia will just have to like the decals for her own room.
End result? I love it. Just how I pictured if not a little bit better.
Next up? Painting the pink crib yellow this time. Hint: I took a yellow decal leaf with me when I picked the color for the crib. And re-painting it was much, much worse than I remembered.


Thanks for posting this! I'm not sure if I am more or less intimidated about trying this myself now ;) The set I picked out seems like it will be much easier than trees though (and less pieces) so hopefully I can handle it. I love the way it turned out, looks so great!!
ReplyDeleteLove this room! really great colors- speaking of colors what color is the gray paint? Do you have the name of it?
ReplyDeleteMolly--It's Gliden's Seal Gray. Love it!
DeleteIt came out great! You really must have the patience of a saint - I can't imagine spending 6-8 hours on a project like this!
ReplyDeleteThat is seriously awesome!! I have never been into wall decals, but I think I might have to reconsider. They look so awesome and so unbelievably real! Nice job!
ReplyDeleteOh I love this! So neat!
ReplyDeleteLooks amazing, Julia! I always have loved your adorable nurseries! I think this one is going to be the best one yet!
ReplyDeletei have never been a fan of decals, but i guess that is because i've never seen them look this good! SO cute and such a precious idea. love your choice and can't wait to see how the room comes together. i seriously have no idea how you accomplish this much with two kids and a job.
ReplyDeleteThis is so awesome, Julia! I love the way it turned out! Totally a labor of love, but so worth it! I can't wait to see the rest of the room!
ReplyDeleteI put the same exact trees up for my son's nursery but I ended up going with the more juvenile owls and birdhouse because I did an owl "theme" in his room hehe. I had to do this all by myself when I was 6 months pregnant because my husband had just broken his leg. So that confirms anyone's suspicions that it CAN be done solo by a pregnant lady. Love the yellow and red though. It's giving me ideas for the second baby if/when that happens.
ReplyDeleteLove it!
ReplyDeleteMy husband was close to a meltdown at one point putting up the decals in M's room. Trickier than you imagine! They look so good though! We hope to move at some point and that's one reason I would hate to move - those decals. It'll come down to: do I want a backyard or the decals - backyard, of course, but still! ;)
ReplyDeleteI never thought much about wall decals either but I have to say yours are probably the best I've ever seen! It almost looks painted on the walls in these pictures. I have to agree that the flying birds and falling leaves are my favorite part and I'm very much loving the color scheme. Can't wait to see it in person and…ahem…possibly do some lifestyle newborn shots in there ;)
ReplyDeleteI adore the birch trees so much. So totally worth the work (says me, who didn't have to do it). They really pop on that wall color, too.
ReplyDeleteA-ma-zing.
ReplyDeleteLove it! Thanks for posting! Truly a great way to decorate. I think simple wall decals (with class) can really add life to any room. I recently bought some wall silhouettes (safari animals) from www.LifeSizeSilhouettes.com to dress up my boy's room. What a difference! I was really pleased with them. Keep up the good ideas!
ReplyDeletegreat job!!
ReplyDeleteEverything Birds With Vinyl
Tree vinyl wall art decals are perfect to give jungle look to your room.
ReplyDeleteI love your room! Do you remember the color names of the yellow and orange you used? The link for the decals you purchased showed colors offered- I couldn't tell by the pic if you used yellow and orange vs Golden yellow and bright orange.
ReplyDeleteI love your nursery and your colors! Do you remember if the yellow and orange colors you used were either bright orange and golden yellow vs orange and yellow? (Based on the names from the decal website color chart) I can't exactly tell in the photo. Thanks!!
ReplyDeleteThank you! I believe it was golden yellow and orange for the colors, the 'golden' rings a bell!
Delete